30 novembro 2018

Lulu with the Pie | The Paper Nest Doll

Hi There,

Today I wanted to share another one of the NEW Tootsie Dolls.......this is Lulu with Pie, and She is absolutely stunning.

I use Kraft paper and Prismacolor Pencils to color her and this is the result:
I use a old paper pad from my destash and tried to inspire myself in the colors of the decorative paper...


Thank you so much for stopping by!
Hugs!!!!

Edwin Gift Bag | Swedish House Crafts

Hi There!!!!!!
Here I am again to bring another project made to Swedish House Crafts. I´ve made a little present box using the amazing Edwin - You´re Invited - December Calendar Kit 2017.

For tutorial you will need a template for this cute Gift Box.

Now I dont made The colors legend, but you can find all the colors I use for painting my Beautiful stamp here:
PRISMACOLOR PENCILS:
Skin: 946-935-938-914-939-945-927-937
Cheeks: 924-922
Hair: 946-935-1002
Pants:1027-901-935-903-1103-1087-938
Sweaters: 903-1103-1087-914-935
Rose: 922-924-935-938-912-908
Shoes: 094-1070-935-946-945
For Blending: Prismacolor incolore PC 1077


All the List Supplies:
DooHickey Christmas Edition Vol. 4
You're Invited - December Calendar Kit - Edwin

I hope to have inspired you and see you soon ...


29 novembro 2018

Gummiapan Snow Bear | Swedish House Crafts


Hi there!!!

So today I bring you the fabulous Gummiapan Die - Milk Carton decorated with the beautiful papers of the latest collection of Maja Design - Christmas Season as well as the beautiful Gummiapan Snow Bear Stamp I painted with my prismacolor pencils.

Those who know me know that I love little boxes and it was to make them that I started my walk through the world of scrapbooking.

And here is my project...

I use Prismacolor pencils to coloring my "Snow Bear Stamp"
Colours:
935-938-927-1084-947-948-1094-1027-1103-1087-918-924-1077(Blender Pencil)

Links to Products I used:
Gummiapan Stamp - Snow Bear
Special Release - Mini Doily (DooH-SR11)

I hope to have inspired you... and I hope to see you soon ...

16 novembro 2018

Envelope Card | Chocolate Hold


Hello everyone!!!!!!

Today I thought of bringing you one of my favourite stamps from Magnolia, the beautiful Pink and Blue Ribbon - Hear No Evil Tilda. This beautiful stamp belongs to a series of six stamps in a total. Pink and Blue ribbon for a cancer fight campaign.

You can follow this template according to the measurements in it. You can see that this Card Envelope is quite versatile and very easy to make.

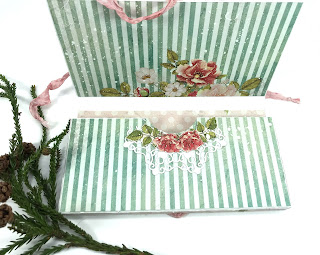
To create this envelope card I used the decorative paper from Laserowe Love "Vintage Trip". Unfortunately we still do not have it in the store yet. This paper has a mix of Pink and Green with a "Vintage" look and how they can see with pretty nice and soft patterns.

Now my Project:

 To create this layout I also use some DooHickey - Magnolia dies as Magnolia Doohickey Club vol 4, and Magnolia Doohickey Club vol 9, as well as a Laserowe Love frame, Oval Flourish Frame.

I hope to have inspired you... and I hope to see you soon ...


11 novembro 2018

Envelope Box

Hey! Here Irene Mendes, for today I prepared a festive chocolate sweets. I labeled them with  "Cardboard" and papers from the Vintage Trip collection. I decorated them with winter flower made with the beautiful paper pad.

I´ve a tutorial for this envelope box card and you can follow the Sep-By-Step...

You will need an A4 sheet of white paper and you should mark the lines on the chart below.


After cutting through the shape shown above, we will crease all the lines well and then we will create our envelope box.

Now we will create a small salience so we can put our present. I'll use a punch to create a half-circle cutout....


Now I must cut all my pieces to decorate my Envelope Box. I will try to leave a small margin of roughly 1 mm.

I'm going to put a ribbon of silk on the tones of my paper so I can tie it with a bow.

After lining my envelope with the decorative paper - Vintage Trip collection, I will prepare the elements that I will use to decorate. 
And although this collection is not christmas themed I'll make it more Christmas and festive and show that this collection is versatile and they can use for any occasion...
I chose a floral frame that will serve as the basis for the floral arrangement that I will prepare. I  use LA18111 - Cardboard - rectangular frame with flowers - Flower

For my Christmas flower I will use some cuttings to create the shape and I will give it a little more color using Distress INK. 
And then with the help of a baller I will break the fibers of the paper to make it more malleable and thus be able to give it the shape of a flower.
Here it is already mounted with several layers. The center of the flower is of dried flowers that I have at home. But you can use stamens on the market with the color you prefer....
For the interior I'll leave it simple, however I'll cut a "Doillie" and position it on the ledge I originally cut and I'll cut out some elements of our decorative paper. And this will be the beautification that I need to give you a bit more personality.


After all the decoration is completed I took some white gesso and I'll give it a snowy look.
Here are the photos with the final result. 


I hope to have inspired you and see you soon ...

06 novembro 2018

🌲 Trees - Karen Burniston Designer Challenge

Hello my Crafy friends!!!!!!!!


Today I´ve made a card for November Karen Burniston Designer Challenge!!!!! Our challenge theme this month is .... "Trees!". So my project for the November Designer Challenge had to be a Nature Card.

I use a mix os dies set: CHRISTMAS TREES POP STAND plus The The House & Fence Pop-up is a very versatile die set. It comes with a Floating Floor mechanism that can be used for so many other things. Plus, the house can be styled for any season. To learn how to assemble this die, check out the video tutorial here: Die Assembly Video - 1015 House & Fence Pop-upThe House & Fence is also going to be great for year-round cards for any theme. This card uses the Tree Pop-up, Nature Edges, Winter Animals and Word Set 1.


I hope to have inspired you and until my next post that will be very soon.
Hugs xxx

03 novembro 2018

The Winter is coming!!!!!

HI MY CRAFTY FRIENDS!!!!!

Today I´ve made another card for Karen Burniston Designer Team!!!!!  I´ve make a card to wellcome to the Winter... Here in Portugal the cold is already felt and accompanied with much rain. In my city it does not snow, but in the highest mountain of my Country there is already snow. So this card is to announce the arrival of winter.

I´ve use the combination of the Pivot Panels die set - the Evergreen and Tag Book Pop-up.

For this card I choose a very old paper pad from Holiday Style "October Afternoon paper pad, and I cut several pictures from the paper pad to make my scene.

Here my Card.... I hope you´re like it...


I hope to have inspired you and until my next post that will be very soon.
Hugs xxx


Em destaque:

Tilda hanging the Balloon ♡ Swedish House Crafts

♡  Hi my crafty friends!!!! ♡  Today I thought of bringing you a project using the incredible Christmas calendar kit stamps and dies. Thi...